Tool Plugin Tutorial
This tutorial shows how to create a new plug-in that adds a distance tool to the uDig application.
This workbook is part of our public training materials:
Downloads:
- distance_icons.zip
Source code:
- Available in your uDig SDK (import the source code from the plugins view)
- plugin: org.locationtech.udig.tutorials.distancetool (github)
Introduction
The uDig application is built on the “Eclipse Rich Client Platform” that offers an alternative to traditional application framework design. The RCP Platform is customized through extensions that contribute to extensions points. The good news is that everything is consistent, everything from adding a tool to creating an application is done in the same manner.
After completing this tutorial, you will have gained the skills to:
- Create a new Plugin
- Define a new Extension
- Implement a new Tool Extension
- Update the map from within a tool
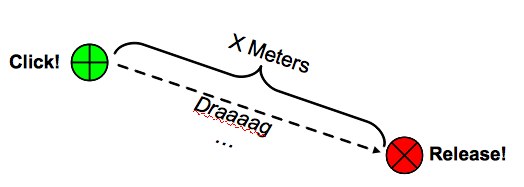
We are going to create a tool that returns the distance between the point the mouse is clicked and the point the mouse is released.
This is a quick workbook often used as an introduction to Eclipse Rich Client Platform development. It is the only workbook we offer that provides detailed instructions on how to create a plugin.Subsequent workbooks will treat the topic as review and not go into as much detail.
Plugin consists of:
- Normal Java Project
- MANIFEST.MF providing a name, version and dependencies (that is other plugins that are required)
- plugin.xml providing information to the Platform class telling it how to wire up the code
- plugin.properties - used for internationalisation of human readable strings
The plugin you create is based on an extension point provided by the uDig project (the tools extension point).
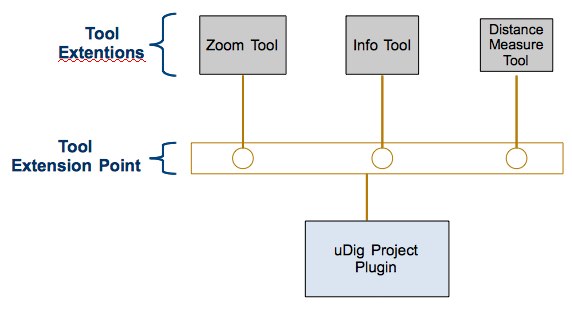
The fact that we are using this tools extension point is the only uDig specific part of the tutorial - so if you have a good Eclipse RCP book then this workbook should be considered review.
Key Points:
- If you are new to Eclipse RCP please considered this as a quick introduction:
- The Eclipse Platform class is responsible for wiring up your application; it reads the plugin.xml files to wire up extensions into extenstion points
- If you are comfortable with Eclipse RCP this workbook can be considered review and an introduction to uDig Tools
- Complete the What to do Next section for an in-depth understanding of this content
What to do Next
The step by step workbook is only part of the store - here are some additional challenges for you to try.
Tool Categories
Tools are organized into “Categories” each with their own keyboard short-cut, the Distance Tool is in the category “Information”.
Create your own Category.
Activator - Plugin Lifecycle Callback Object
Plug-ins have a life cycle (controlled by the Platform class). You can register a callback object called an Activator to be advised when your plugin starts and stops.
The start method is used to provide your Activator with a BundleContext (used to access resources like Icons).
The ID for your Plugin is used so often that it is worth making a constant in your Activator for others to refer to.
public static final String PLUGIN_ID = "org.locationtech.udig.tutorials.distancetool";
This may already be done by the wizard.
Eclipse RCP Logging with .options File
Your activator can also be used to send log messages; and check debug options (from the TRACING page)
To enable this, add a .options file to your plug-in next to plugin.xml. The presense of a ”.options” file tells the system that you have trace options available.
org.locationtech.udig.tutorials.distancetool/debug=true
org.locationtech.udig.tutorials.distancetool/debug/distance=true
At runtime use your Activator to check if tracing is turned on, put the following in the start method:
if( isDebugging() &&
        "true".equalsIgnoreCase(Platform.getDebugOption(PLUGIN_ID + "/debug"))){
    Status status = new Status(IStatus.INFO,PLUGIN_ID,"Distance Tool Started");
    getLog().log(status);
}
Log Distance
With the above example of how to use .option file in mind, output your distance results to the console log.
Hint
This information is currently being displayed in the status bar (eg. 3420 km)
Tool Category Keyboard Shortcuts (Advanced)
You can select the “Information” category by pressing “i”; if you continue to press “i” it will cycle through all available “Information” tools.
Try hooking up your tool category to a keyboard binding.
Hint
Study and existing example.
Tips, Tricks and Suggestions
The following tips, tricks and suggestions have been collected from the udig-devel email list. If you have any questions please drop by and introduce yourself.
Use the Source Luke!
One of the key advantages in open source development; is having access to existing working source code to use as a good example.
This is especially helpful for the keyboard short cuts; you can study how the i key is assigned to the information tool category; and reproduce those steps for your new category.
Use the debugger
Putting break points into a line of code you are interested in - is a great way to learn how it works.