Feature Editor Tutorial
This tutorial provides a step-by-step guide to create a custom Feature Editor.
Table of Contents
- Create the FormCellEditorListener
- Implement the Cell Editor Listener
- Create the MandatoryFormTextCellEditorValidator
- Implement the Cell Editor Validator
- Create the FormTextCellEditor
- Implement the Cell Editor
Introduction
When creating your own application, a common challenge is making a specific user interface for editing your data. Out of the box uDig provides several generic feature editors (the Table view and the Default Feature editor).
In this work book we will make our own feature editor. Our editor will only function on the 10m_admin_0_countries.shp file provided as part of the sample data set. Eclipse RCP concepts covered in this workbook:
- Creating a user interface using SWT widgets
- Integrating Cell Editors, JFace Viewers and Eclipse Forms
- Adding and implementing a View
One thing to pay attention to is the use of Commands. Commands are created to interact with the uDig application from the user interface. Commands dispatched to the GISPlatform are executed with write access to the data model (of Maps, Layers and blackboards).
The feature editor we are making in this tutorial will issue several edit commands modifying a feature that has been loaded onto the Edit Blackboard. This is the same feature being used by the edit tools.
Comparison of SWT and AWT
Eclipse RCP applications make use of the Standard Widget Toolkit (SWT) when defining a user interface. SWT is similar in function to the built-in Java Abstract Window Toolkit. Both libraries use native widgets for display; they only differ in the approach taken at a technical level.
- SWT: Uses a different swt.jar for each platform; the implementation makes direct operating system level calls to create widgets such as buttons and so forth. SWT implements in native code any “missing” widgets (e.g. swt for x85/Motif has contains a tree widget).
- AWT: Uses an Abstract Factory (the Toolkit class) to construct widgets. Each JRE must provide an implementation of this class teaching Java how to make the widgets for that environment. Early implementations of AWT did not quite hide platform differences from developers (resulting in write once test everywhere frustration).
At a pragmatic level both libraries function in a similar manner, making use of an event thread, listeners, layouts and so on.
Comparison of JFace and Swing
Programming at a low level with widgets can be a bit of a pain, a common practice is to formally split responsibility into three parts:
- Model: Objects in the domain of discourse, issues some kind of notification when changed
- View: User interface showing the object state to the user, listens to events and updates the display when needed.
- Controller: Accepts input from the user and changes the domain objects as needed.
With this baseline in mind let’s look at how JFace and Swing compare:
- Swing: Is a high level user interface providing a variation of Model View Controller on top of AWT. To get around platform differences Swing makes use of an AWT Canvas and handles everything else itself. For Swing, the View and Controller have been combined and the construction delegated to a look and feel factory mirroring what is expected on a given platform.
- JFace: Is a high level Model View Controller user interface built on top of SWT. It takes a different approach in that the model objects that make up your domain are left alone. You provide Adapters (sometimes called Providers) allowing the JFace viewers to talk to your existing domain model. This approach is amazing once you get the hang of it.
The big advantage here for JFace is that you only need to implement as many adapters as you care about. All of the JFace viewers work with the same set of adapters so you can quickly see what your domain objects look like in a range of Viewers.
Creating the Plug-In
Let us start off by creating a plug-in that will contain our feature editor.
- Create plug-in named org.locationtech.udig.tutorials.featureeditor.
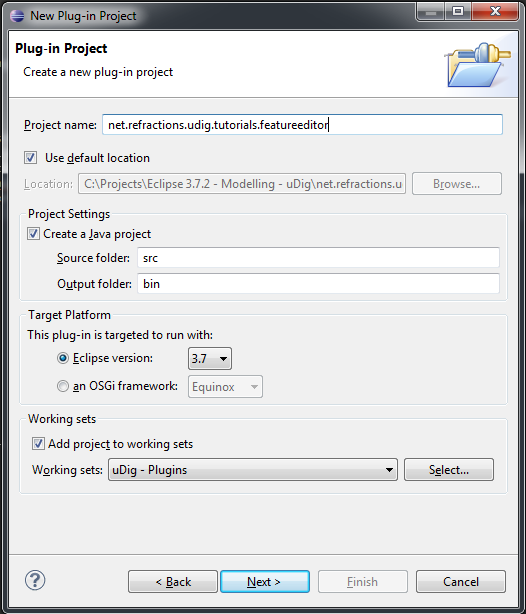
Fig. Create plugin dialog
- In the MANIFTEST.MF editor switch to the Dependencies tab.
- Add the following plug-in dependency:
- org.locationtech.udig.project.ui
- org.eclipse.ui.forms

Fig. Add dependencies
- Save the MANIFTEST.MF file.
Customising Cell Editors
JFace cell editors are wrapped widgets that are primarily used to allow editing values in table viewers. Here we try to re-use and customise cell editors to be usable in forms. So let us sub-class one of the most basic cell editors in TextCellEditor and hook up an ICellEditorListener and an ICellEditorValidator.
Create the FormCellEditorListener
- Select File > New > Class from the menu bar to open the New Java Class wizard
- On the New Java Class dialog, set the following:
- Source folder: org.locationtech.udig.tutorials.featureeditor/src
- package: org.locationtech.udig.tutorials.featureeditor
- Name: FormCellEditorListener
- Add the interface:
- org.eclipse.jface.viewers.ICellEditorListener
- The dialog should look like this when you are done:
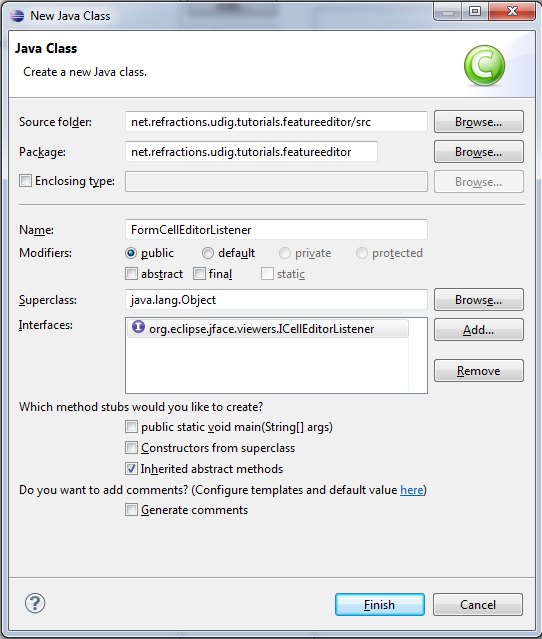
Fig. Create cell editor listener dialog
- Press Finish to create FormCellEditorListener.java class
Implement the Cell Editor Listener
- Create class variables.
private IMessageManager msgManager;
private CellEditor cellEditor;
- Implement the constructor.
public FormCellEditorListener( CellEditor cellEditor, IMessageManager msgManager ) {
   this.cellEditor = cellEditor;
   this.msgManager = msgManager;
}
- Implement the interface methods.
@Override
public void applyEditorValue() {

   final Control control = cellEditor.getControl();
   msgManager.removeMessages(control);

   final String errMsg = cellEditor.getErrorMessage();
   if (errMsg != null) {
       msgManager.addMessage(control, errMsg, null, IMessage.ERROR, control);
   }

}

@Override
public void cancelEditor() {
   // Nothing
}

@Override
public void editorValueChanged( boolean oldValidState, boolean newValidState ) {
   // Nothing
}
- Use Control-Shift-O to fix up the imports as needed.
Notes:
- Wondered where the error message that we are using gets set? Well, this is what our validator (next step) does.
- Notice that we are passing in a message manager, this facilitates showing the error message on the UI, don’t worry about where this one comes from, everything will come together when we integrate the pieces together in the view panel.
- The sequence of cell editor events (validation, value changed, apply change, etc.) vary from each cell editor implementation to another. In our case, applyEditorValue() is done on lose of focus and validation is done before this event is fired.
Create the MandatoryFormTextCellEditorValidator
- Select File > New > Class from the menu bar to open the New Java Class wizard
- On the New Java Class dialog, set the following:
- Source folder: org.locationtech.udig.tutorials.featureeditor/src
- package: org.locationtech.udig.tutorials.featureeditor
- Name: MandatoryFormTextCellEditorValidator
- Add the interface:
- org.eclipse.jface.viewers.ICellEditorValidator
- The dialog should look like this when you are done:
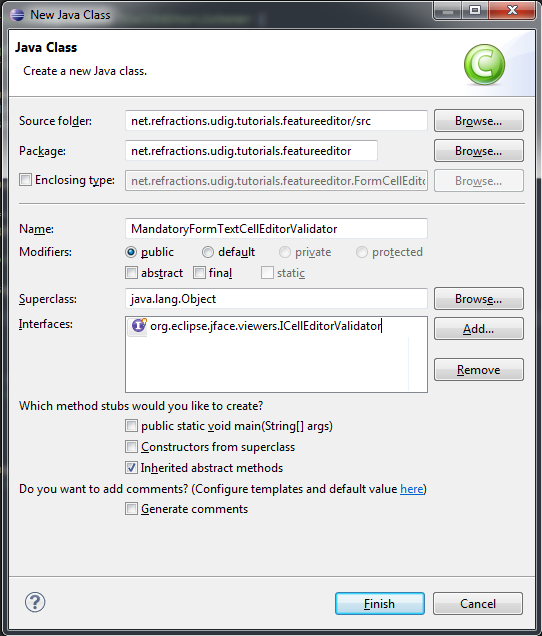
Fig. Create cell editor validator dialog
- Press Finish to create MandatoryFormTextCellEditorValidator.java class
Implement the Cell Editor Validator
- Implement the interface method.
@Override
public String isValid( Object value ) {
   final String textValue = (String) value;
   if ("".equals(textValue)) {
      return "Field must not be blank.";
   }
   return null;
}
Notes:
- Our example simply checks if the cell editor’s value is blank or not. You may create a more complex logic as you like.
Create the FormTextCellEditor
- Select File > New > Class from the menu bar to open the New Java Class wizard
- On the New Java Class dialog, set the following:
- Source folder: org.locationtech.udig.tutorials.featureeditor/src
- package: org.locationtech.udig.tutorials.featureeditor
- Name: FormTextCellEditor
- Set the class below as superclass:
- org.eclipse.jface.viewers.TextCellEditor
- The dialog should look like this when you are done:
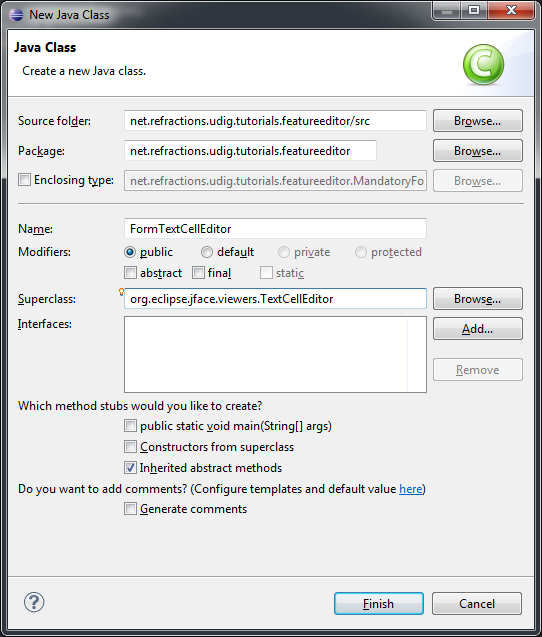
Fig. Create cell editor dialog
- Press Finish to create FormTextCellEditor.java class
Implement the Cell Editor
In this section, we implement our cell editor, then set a validator and add a listener to the editor. This allows integration of the editor, its validation and publishing the error message to the UI.
- Implement the constructor.
public FormTextCellEditor(Composite composite, IMessageManager msgManager) {
   super(composite, SWT.SHADOW_IN | SWT.BORDER);
   setValidator(new MandatoryFormTextCellEditorValidator());
   addListener(new FormCellEditorListener(this, msgManager));
}
- Override the methods that control cell editor’s enablement and visibility, which are used in table viewers, but is not really necessary in our implementation since we want the editors to be visible and enabled all the time.
@Override
public void activate() {
   // Do nothing
}

@Override
public void activate( ColumnViewerEditorActivationEvent activationEvent ) {
   // Do nothing
}

@Override
public void deactivate() {
   // Do nothing
}

@Override
protected void deactivate( ColumnViewerEditorDeactivationEvent event ) {
   // Do nothing
}
- Use Control-Shift-O to fix up the imports as needed.
Creating the View Panel
In this section we will create CountryPanel that populates a Composite with widgets for editing a feature. It is worth noting what elements and layout techniques we use to create the panel.
- Select File > New > Class from the menu bar to open the New Java Class wizard
- On the New Java Class dialog, set the following:
- Source folder: org.locationtech.udig.tutorials.featureeditor/src
- package: org.locationtech.udig.tutorials.featureeditor
- Name: CountryPanel
- Add the following interfaces:
- org.eclipse.swt.events.KeyListener (for text events)
- org.eclipse.jface.viewers.ISelectionChangedListener (for Combo events)
- The dialog should look like this when you are done:
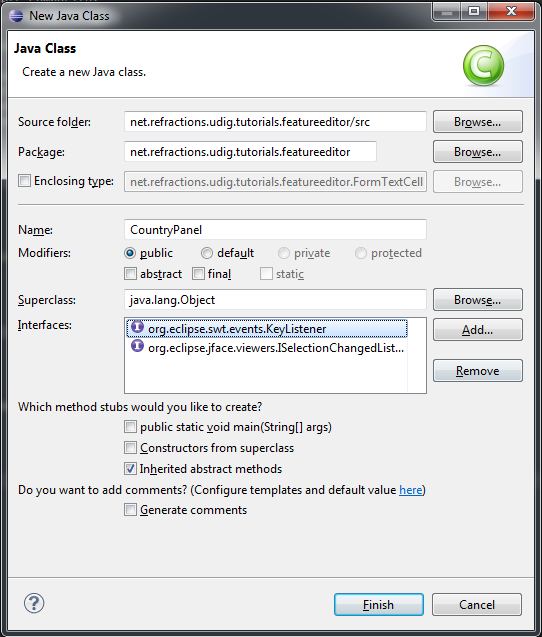
Fig. Create view panel dialog
- Press Finish to create CountryPanel.java class
Constants and Variables
Now let us set-up some constants and variables that we will be using later on hook up to the panel’s elements.
- Add the following constants.
These values represent names of attributes in countries.shp file:
// Name of NAME_FORMA attribute
public final static String NAME_FORMA = "NAME_FORMA";

// Name of NAME_SORT attribute
public final static String NAME_SORT = "NAME_SORT";

// Name of MAP_COLOR attribute
public final static String MAP_COLOR = "MAP_COLOR";

// Possible values of MAP_COLOR attribute
public final static Double[] MAP_COLOR_OPTS;
static {
   MAP_COLOR_OPTS = new Double[13];
   for( int i = 0; i < MAP_COLOR_OPTS.length; i++ ) {
      MAP_COLOR_OPTS[i] = Double.valueOf(Integer.toString(i + 1));
   }
}
- Add the following class variables.
// Form elements
private ScrolledForm form;

// Input fields
private Text nameFormal;
private Text nameShort;
private ComboViewer colorMap;

// Action buttons
private Action apply;
private Action reset;

// Feature containers
private SimpleFeature editedFeature;
private SimpleFeature baseFeature;

// Used to send commands to the edit blackboard
private IToolContext context;
- We are now going provide a method that sets up the user interface (literally a control) for use. The method will take a Composite as its parent and our widgets be added as children of this composite.
public void createControl(Composite parent, FormToolkit toolkit) {
   // Instantiate Eclipse Forms
   // Create Cell Editors
   // Create JFace Viewer
   // Hook up providers
   // Create buttons
}
- Create a method to specify which control will have focus when our panel opens.
public void setFocus() {
   nameFormal.setFocus();
}
- Use Control-Shift-O to fix up the imports as needed.
Using Eclipse Forms
Eclipse Forms is a layer above SWT that provides us with a web looking user interface. This also gives us some other options in creating UI (eg. additional widgets) that helps us create a elegantly functional interface, which also gives us the simplicity of handling widgets the same way as we would if we create them separately.
Using the FormToolkit, let us create the form element that will hold our widgets:
// Instantiate Eclipse Forms
form = toolkit.createScrolledForm(parent);

form.setText("Country Form");
form.getBody().setLayout(new GridLayout());
toolkit.decorateFormHeading(form.getForm());

final Section section = toolkit.createSection(form.getBody(), Section.TWISTIE | Section.TITLE_BAR);
section.setText("Country Details");
section.setDescription("Update country details below.");
section.setLayoutData(new GridData(GridData.FILL_BOTH));
section.setExpanded(true);

final Composite client = toolkit.createComposite(section, SWT.NONE);
client.setLayoutData(new GridData(GridData.FILL_BOTH));
client.setLayout(new MigLayout("wrap 2, fillx", "[20%!, right]10[left]", ""));
section.setClient(client);
Use Control-Shift-O to fix up the imports as needed.
Notice that we are able to use both GridLayout and MigLayout into our containers.
Using Cell Editors
Now let us integrate the cell editors that we created earlier.
- Create the Name (formal) field:
// Create Cell Editors
Label label = new Label(client, SWT.SHADOW_IN);
label.setText("Name (formal):");

FormTextCellEditor nameFormalEditor = new FormTextCellEditor(client, form.getMessageManager());
nameFormal = (Text) nameFormalEditor.getControl();
nameFormal.setLayoutData("growx");
nameFormal.addKeyListener(this);
- Then the Name (short) field:
label = new Label(client, SWT.SHADOW_IN);
label.setText("Name (short):");

FormTextCellEditor nameShortEditor = new FormTextCellEditor(client, form.getMessageManager());
nameShort = (Text) nameShortEditor.getControl();
nameShort.setLayoutData("growx");
nameShort.addKeyListener(this);
Use Control-Shift-O to fix up the imports as needed.
Notes:
- The form’s IMessageManager is passed to the cell editor. This will integrate the cell editor’s validation mechanism with our form to provide visual feedback.
- Using basic widgets (Label) along with wrapped widgets (cell editor) should not affect our panel.
- The widget’s MigLayout data strings (“growx”) are used to communicate to the layout manager how we want the widget to be arranged on screen.
- KeyListeners are added to the input fields to keep track change in their values.
Using JFace Viewers
Now let us integrate JFace viewers into our form.
- Create the Color field:
These viewers are created the same way as the widgets. We need to provide them a parent to create the internal SWT widget on or provide the widget yourself. And each viewer provided a getControl() method allowing you to control the layout of the viewer’s managed SWT widget(s).
// Create JFace Viewer
label = new Label(client, SWT.SHADOW_IN);
label.setText("Color");

CCombo colorCombo = new CCombo(client, SWT.READ_ONLY | SWT.BORDER);
colorMap = new ComboViewer(colorCombo);
colorMap.addSelectionChangedListener(this);
colorMap.getControl().setLayoutData("span 3, wrap");
- Then set up up a couple of providers to allow the viewer to read and interpret the data input.
Set a ContentProvider to control how viewer data is derived from our data input.
// Hook up providers
colorMap.setContentProvider(new IStructuredContentProvider(){
   public Object[] getElements( Object inputElement ) {
      if (inputElement instanceof Object[]) {
         return (Object[]) inputElement;
      }
      return null;
   }
   public void inputChanged( Viewer viewer, Object oldInput, Object newInput ) {
      // for dynamic content we would register listeners here
   }
   public void dispose() {
      // dispose elements as necessary
   }
});
Set a LabelProvider to control what and how data labels will we displayed in the viewer.
colorMap.setLabelProvider(new LabelProvider(){
   public String getText( Object element ) {
      return " " + element + " color";
   }
});
Finally, let us set the constant we created earlier as the data input of our viewer.
colorMap.setInput(MAP_COLOR_OPTS);
- Use Control-Shift-O to fix up the imports as needed.
Notes:
- We set an array of objects as our data input and thus the providers will work with each element in the array.
- Since we passed in an array, the content provider simple returns the data input as our viewer’s elements.
- The label provider customises the label by appending a string to describe each element.
- The JFace viewer provides the selection as an Object compared to an SWT Combo widget which provides the label string.
Create Action Buttons
Now let us create some action button elements for applying and reseting changes on the form.
// Create buttons
apply = new Action("Apply"){
   @Override
   public void run() {
      applyChanges();
   }
};
apply.setEnabled(false);
form.getToolBarManager().add(apply);

reset = new Action("Reset"){
   @Override
   public void run() {
      resetChanges();
   }
};
reset.setEnabled(false);
form.getToolBarManager().add(reset);

form.getToolBarManager().update(true);
Notes:
- Instead of Button widgets we created JFace Action objects since we are adding these controls into the form’s toolbar.
- Expect compile errors at this point as the methods applyChanges() and resetChanges() will be implemented later to facilitate feature editing.
Implement Listeners
Now let us implement the interfaces that we added during creation of the panel.
- Create a method that will control the enablement of both the Apply and Reset buttons.
private void setEnabled(boolean enabled) {
   if (baseFeature == null && enabled) {
      return;
   }
   apply.setEnabled(enabled);
   reset.setEnabled(enabled);
}
- Now lets fill in the two methods of the KeyListener interface that we hooked up to our text input fields.
public void keyPressed(KeyEvent e) {
   // Do nothing
}

public void keyReleased(KeyEvent e) {
   setEnabled(true);
}
- And also fill in the method of the ISelectionChangedListener interface that we hooked up to our combo viewer’s control.
public void selectionChanged(SelectionChangedEvent event) {
   setEnabled(true);
}
Integrating Commands
Now that we have created our UI elements and some hooks for action handling, let us get back to normal uDig development. Let us set up how the form handles editing a feature.
We need to make a copy of the current feature. This allow the user to edit or revert to the unedited copy when we want to reset changes. We also need to send off the changes to the uDig application using a Command when the user hits Apply.
- To start with, let us create a method that accepts the feature input:
public void setEditFeature(SimpleFeature newFeature, IToolContext newContext) {

   this.context = newContext;
   baseFeature = newFeature;

   if (baseFeature != null) {
      try {
         editedFeature = SimpleFeatureBuilder.copy(newFeature);
      } catch (IllegalAttributeException e) {
         // shouldn't happen
      }
   } else {
      editedFeature = null;
   }

   if (baseFeature == null) {
      nameFormal.setText("");
      nameShort.setText("");
      colorMap.setSelection(new StructuredSelection());
   } else {

      String nameFormalVal = (String) baseFeature.getAttribute(NAME_FORMA);
      if (nameFormalVal == null) nameFormalVal = "";
      nameFormal.setText(nameFormalVal);

      String nameSortStr = (String) baseFeature.getAttribute(NAME_SORT);
      if (nameSortStr == null) nameSortStr = "";
      nameShort.setText(nameSortStr);

      Double colorText = (Double) baseFeature.getAttribute(MAP_COLOR);
      if (colorText != null) {
         colorMap.setSelection(new StructuredSelection(colorText));
      } else {
         colorMap.setSelection(new StructuredSelection());
      }

   }

   setEnabled(false);

}
- Implement the applyChanges() method.
This will update the editedFeature and then make use of a composite command to send the changes off to the uDig application.
private void applyChanges() {

   // Set changes to feature
   try {
      editedFeature.setAttribute(NAME_FORMA, nameFormal.getText());
      editedFeature.setAttribute(NAME_SORT, nameShort.getText());
      StructuredSelection colorSelection = (StructuredSelection) colorMap.getSelection();
      editedFeature.setAttribute(MAP_COLOR, colorSelection.getFirstElement());
   } catch (IllegalAttributeException e) {
      // shouldn't happen.
   }

   // Send command to write changes
   CompositeCommand compComm = new CompositeCommand();
   compComm.getCommands().add(context.getEditFactory().createSetEditFeatureCommand(editedFeature));
   compComm.getCommands().add(context.getEditFactory().createWriteEditFeatureCommand());
   context.sendASyncCommand(compComm);
   setEnabled(false);

}
- Implement the resetChanges() method.
This will reset the editedFeature to the un-touched baseFeature.
private void resetChanges() {
   setEditFeature(baseFeature, context);
   setEnabled(false);
}
- Use Control-Shift-O to fix up the imports as needed.
Now we have made our own panel that can be used to edit a feature. In the next section we will hook this up to our view.
Defining the View
A view is used to display or explore information. Views often allow direct manipulation of selected content.
- Open the MANIFTEST.MF editor switch to the Extensions tab.
- Add the following extension:
- org.eclipse.ui.views
- You can fill in the details for your view extension:
- ID: org.locationtech.udig.tutorials.featureeditor.views
- Name: Feature Editor Views
This information is only used in error messages when something goes wrong which is very helpful when debugging! We are using the plural (views) because more than one view can be provided.
- Right click on org.eclipse.ui.views and select New > view
- Select name (view) and configure the following:
- id: org.locationtech.udig.tutorials.featureeditor.views.country
- name: Country
- class: org.locationtech.udig.tutorials.featureeditor.CountryView
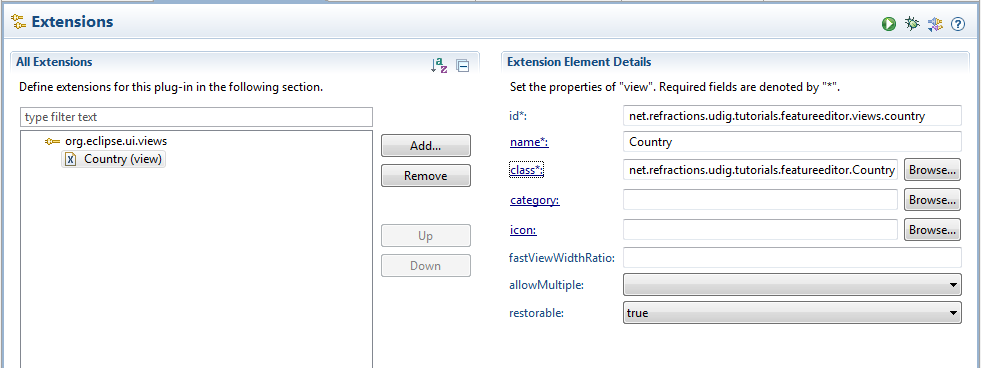
Fig. Add view extension
- Save the MANIFTEST.MF file.
- Press the class link to open the New Java Class wizard.
- Add the following interfaces:
- org.locationtech.udig.project.ui.IUDIGView
- The dialog should look like this when you are done:
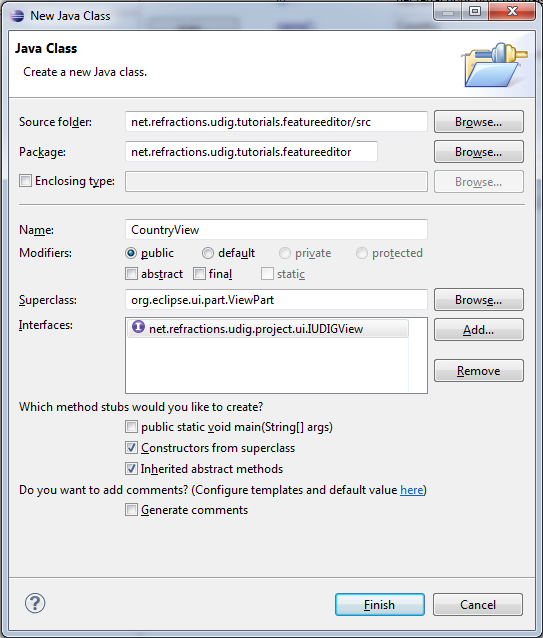
Fig. Create view dialog
- Click Finish to create the CountryView.class class
Implementing the View
Now let us implement that view that we have defined in the previous step.
Integrating the View Panel
- Open CountryView.
- Create a view panel as a class variable.
private CountryPanel panel = new CountryPanel();
- Override the createPartControl(Composite) method. We will use this to set up our panel to create the user interface.
@Override
public void createPartControl(Composite parent) {
   FormToolkit toolkit = new FormToolkit(parent.getDisplay());
   panel.createControl(parent, toolkit);
}
- Override the setFocus() method. We will use this to set up our panel to set the focus.
@Override
public void setFocus() {
   panel.setFocus();
}
- And there is the dispose() method. In our case, the super class is going to take care of cleaning up our widgets, but you could override this method to take care of any resources you made use of (such as Icons or Colors).
- Use Control-Shift-O to fix up the imports as needed.
We will continue to implement this class in the next section and get rid of those compile errors.
Notes:
- It is very important that the constructor and init methods do not try and do much in the way of work - if they take too long they will be considered broken and the entire view turned off!
Implementing IUDIGView
The IUDIGView is used to feed a tool context into a normal Eclipse view allowing it to interact with the GISApplication. This interface also gives us a hook to the current edit feature which we are using to fill in our form.
- Create a tool context as a class variable.
private IToolContext context;
- Implement the getter and setter method for the tool context.
@Override
public void setContext( IToolContext newContext ) {
   context = newContext;
}

@Override
public IToolContext getContext() {
   return context;
}
- Implement the editFeatureChanged(SimpleFeature) method. This provides the view with the feature to be edited.
@Override
public void editFeatureChanged( SimpleFeature feature ) {
   panel.setEditFeature(feature, context);
}
- Use Control-Shift-O to fix up the imports as needed.
Notes:
- The editFeatureChanged(SimpleFeature) method is triggered by a feature selection.
- At this point the view is now ready to use.
Trying it Out
Run uDig
- Add the plugin to uDig’s run configurations.
- Run uDig.
Load Shapefile
- Add the sample data 10m_admin_0_countries.shp file to a Map.
- Take a moment to set up a theme style based on the MAP_COLOR attribute.
Open the View
- Open our feature editor view. Go to Window > Show View > Other
- A view selection dialog will pop up, select the Country view.
Select a Feature
- Open the tab for Selection tools.
- Select the Feature Selection tool.
- Select a country on the map.
- The view will display the country’s information.
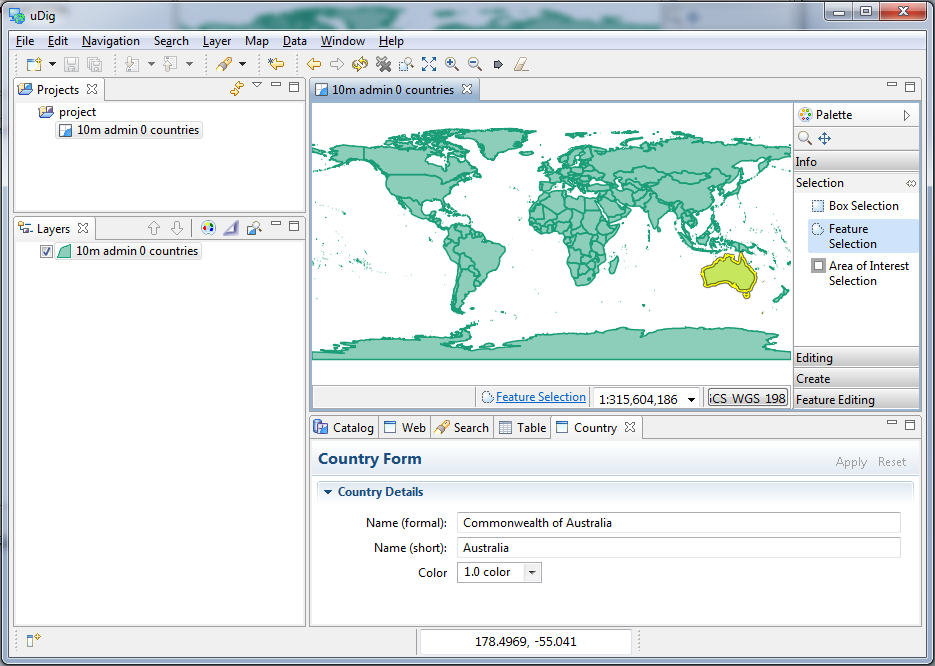
Fig. Open view
Update Information
- Update country information as needed.
- Try leaving the name fields blank to see validation fire.
- Press Apply or Reset as needed.
What to do Next
Okay, I am sure you can think of lots of things to try:
- Eclipse now includes WindowBuilder. Can you quickly draw up an alternate layout of this feature editor?
- The MiG Layout manager is a very nice trade-off between readability and risk of run time errors. For more information on the layout manager visit: http://www.miglayout.com. In particular the website documentation to get you started and a couple of JavaWebStart demo applications.
Fig. MigLayout samples
Can you re-do the layout of this view using the Eclipse FormLayout? This layout manager makes the opposite trade off you have real Java data structures to fill in for your layout data. Here is a small example to get you started:
parent.setLayout(new GridLayout(2, false));

// SWT Widgets
Label label = new Label(parent, SWT.SHADOW_IN);
label.setLayoutData(new GridData(SWT.NONE, SWT.FILL));
label.setText("Country:");
MiGLayout has now added the use of java beans as a type safe options:
name = new Text(parent, SWT.SHADOW_IN | SWT.BORDER);
CC cc = new CC();
cc.spanX(3);
cc.growX();
cc.wrap();
name.setLayoutData( cc );
name.addKeyListener(this);
You can use this technique to make custom forms for your own data using the full facilities of SWT and JFace (say stars for restaurant reviews).
If this is your first time using SWT try experimenting with the different Layouts: GridLayout, TableLayout, and FormLayout.
Try moving the functionality that controls enabling/disabling the Apply and Reset buttons to the cell editor listener.
Try adding logic to disable the apply button when there is an error during validation.
Advanced: You can make many Views - try making one that provides a summary of the Map. You should be able to list the number of layers, and listen to events to notice when layers are added and removed. (Hint: Look at EMF Notifier for very low level events beyond what the listeners provide)